产品展示
product
PRODUCT
- Security Products
- X-ray Machine
- ZK140100 gantry X-ray security inspection equipment
- ZK-200200 High Definition X-ray Safety Inspection Equipment
- ZK-150180 High Definition X-ray Safety Inspection Equipment
- ZK-8065C type X light security inspection machine
- ZK-8065A type X light security inspection machine
- ZK-6550C type X light security inspection machine
- ZK-6550A type X light security inspection machine
- ZK5030C type X light security inspection machine
- ZK5030A type X light security inspection machine
- ZK100100C type X light security inspection machine
- ZK100100A type X light security inspection machine
- ZK10080C type X light security inspection machine
- ZK10080A type X light security inspection machine
- Security Door Series
- Chute
- 803/18--18 partition precise metal security door
- 803/33--33 district professional precision metal security door
- 804 series through type metal security door
- 803-- network video surveillance security door
- 803C-- large screen color LCD display through the metal security door
- 803A-- large screen liquid crystal display type through metal security door
- 802 waterproof type through metal detection gate
- Type 802 (6 location) through type metal security door
- 801- (6 partition) metal security door
- ZK-801A single location through type metal security door
- ZK-800 folding portable security door
- Handheld Metal Detectors
- Sole Metal Detector
- Portable Needle Detector
- Inspection Mirror
- Underground Metal Detectors
- X-ray Machine
- Channel Gates
- Three Roller Gate Series
- Zk-1202 bridge fillet three roller brake
- ZK-1262 (bridge inclined plane) three roller brake
- ZK-1232 (bridge arc) three roller brake
- ZK-1228 (bridge butterfly shaped) three roller brake
- Zk-1222 (bridge trapezoid) three roller brake
- Zk-1218 bridge fillet three roller brake
- Zk1201 vertical fillet three roller brake
- Swing Gate Series
- ZK-1322 (bridge trapezoid) swing gate
- ZK-1313 (manual type) swing gate
- ZK-1312A (bridge inclined plane) swing gate
- ZK-1312 (double trapezoidal swing gate bridge movement)
- ZK-1311 (vertical duckbill) swing gate
- ZK-1303 (guardrail type) swing gate
- ZK-1302 (bridge fillet) swing brake
- ZK-1301 (vertical fillet) swing brake
- Wing Gate Series
- Barrier-free Channel Series
- Three Roller Gate Series
0755-89768358
89389822
Where You Are: Home > Product > Security Products > Inspection Mirror >
Product Details
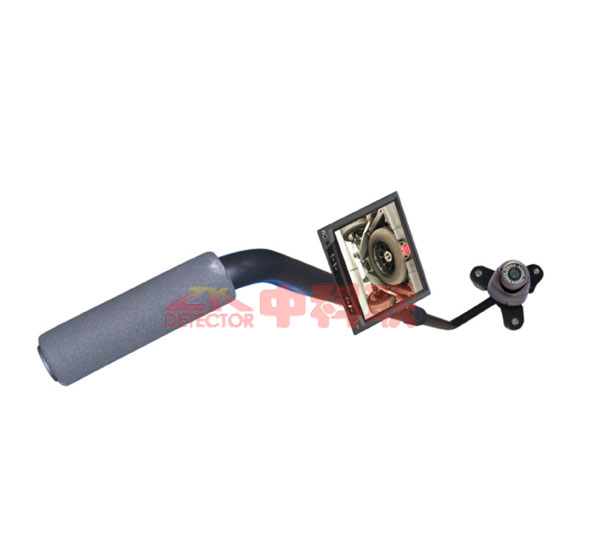

Seven inch DVR Inspection Mirror
Product Description
Recording type
1、Boot
Connect all the joints and press the power key,the system will start to work.
2、Menu settings (MENU)
1>Press the MENU key to enter the menu page.
2>Press the MENU key again to select the setting content, including date
Setting. time setting, recording time setting, recording model setting,
Contrast setting and color setting.
3>After selecting the settings, press the + key to set the option upward,
and press the-key to set the option downward.
4>After finishing setting , press the QUIT key to quit the setting.
3、Record(+)
1>Press the +key to start recording. On the upper left corner of the display
will show the recording mark, on the lower left corner will show the
recording time.
2>After recording one package, it will stop recording automatically then
Packaging it and save it into SD card.(each package is recording as
Long as the menu setting, such as 5S 10S 30S 60S 120S)
3>press the +key to quit while recording.
Note: this “record” key can not afford continuously record, it can only
Record one package at one time, t you want to record again after finishing
The former one, you should press the +key again
4.Take pictures(DEL)
Press the DEL key to take a picture; it will save it into the SD card automatically.
5. Continuously record(REC)
1>Open the menu to enter the recording model setting, set it as AVI model.
2>Press the REC key to start continuously recording, what you have recorded will be automatically packaged and saved according to the recording time in your menu setting.
3>During the recording process, press the REC key to quit recording and the content will be packaged and saved automatically. Note: while continuously recording , pressing the REC key will not stop recording at once until finishing one package. If shutdown or cut off the power or some other methods to forcibly stop recording, the content can not be saved.
6.Continuously take pictures (REC)
1>Open the menu and enter the recording model setting, set it as PICTURE model.
2>Press the REC key to start continuously taking pictures.
3>Press the REC key again to quit continuously taking pictures.
7. View the video(-)
1>Press the – key to show the saved recorded packages, on the lower left comer will show the quantity of the saved recorded packages, on the lower right comer will show the recorded date and time.
2>Press the –or + key again to select the recorded package you need to view.
3>Press the MENU key to start playing the selected recorded package.
4>Press the OUIT key to quit the current operation.
8.View the pictures(OUIT)
1>Press the OUIT key to show the saved pictures, on the lower left corner will show the quantity of the saved pictures, on the lower right corner will show the date and time of the pictures.
2>Press the –or + key to quit the current operation.
9. Delete(DEL)
1>Delete the video
Press the – key to enter the saved recorded packages, press the + or – key to select the recorded packages you need to delete, then press the DEL key to delete them.
2>Delete the pictures
Press the QUIT key to enter the saved pictures, press the + or – key to select the pictures you need to delete, then press the DEL key to delete them.